#
🚀 Getting Started
This guide will walk you through installation and initial setup so you can start managing your PlayerPrefs and EditorPrefs like a pro. 💪
#
📦 Installation
Installing EazyPrefs is quick and easy:
- Download and import EazyPrefs from the Unity Asset Store.
- By default, the asset will be placed under
Assets/Hellmade/EazyPrefs - EazyPrefs requires the Newtonsoft Json package. Unity will prompt you to install it if it’s not already present in your project.
You can access the EazyPrefs editor by navigating to Window > Hellmade Games > EazyPrefs
This is your central hub for managing all prefs.
From this window, you can view, edit, create, delete, and organize your prefs.
#
⚙️ Setup
Initializing and setting up EazyPrefs is super simple! You just need to:
- Initialize a configuration file
- Generate Pref Wrappers
#
Initialize Config
Before you can use EazyPrefs, you need to initialize a configuration file. Without it, the system will not function.
When you first open the EazyPrefs window, you’ll see a screen like this:
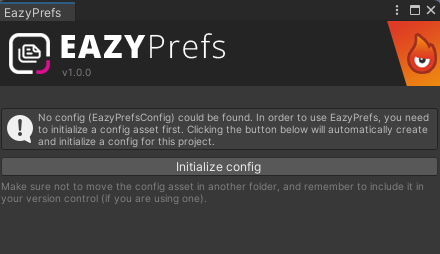
Click the Initialize config button to automatically create the required config asset.
Why is this needed?
The config stores all settings and customization data for EazyPrefs. It must exist for the tool to function properly.
Once initialized, the config file will be created at the following path:
Assets/Resources/EazyPrefs/EazyPrefsConfig.assetDo not rename or move this file!
The config must stay exactly at this location with this name. If it’s renamed or moved, EazyPrefs will not be able to detect it.
#
Generate Pref Wrappers
Then, you need to generate Pref Wrappers. This is not mandatory, but it is needed if you like to use Static access
Using version control?
We strongly recommend committing the config file and the pref wrappers to your version control system. This ensures consistent behavior across machines and team members.